Intro
Botloader is a hosted programmable discord bot with no default functionality. Any functionality has to be added by the server admins.
The bot is programmed using typescript and you can program it either through the Visual Studio Code extension or using the web based editor.
This book contains various guides to creating botloader scripts.
Note that this book is still relatively WIP.
Script management
Scripts are managed either through the Web-Based Code Editor or through Visual Studio Code.
Script development on the web browser
Note: the web editor does not support mobile.
To manage your servers scripts, you log onto the website, click select server in the top right and select your server.
After that you will have a sidebar on the left, click on the "scripts" entry to manage your server scripts.
From here you can create, delete and toggle a scripts enabled/disabled status.
If you click on the edit button you will be taken to the web editor based on Monaco.
In the web editor you will have full intellisense and autocomplete support.
To deploy your changes simply press ctrl-s or the save button on the right.
Script development through vs code
Setting up the extension
To use the visual studio code extension, download the botloader extension from the marketplace.
After that you need to grab an API key from the botloader.io website, you do this by logging in and navigating to your user settings.
Once you have copied a API key you can press ctrl-shift-p in vs code to bring up the command palette then use the botloader set api key command
Set up a workspace
To manage scripts on a server you must setup a workspace. To set up a workspace open the command palette and issue the botloader set up workspace command, this will bring up a guild selection afterwards followed by picking a persistent or temporary directory to set up the workspace in.
Once you're in the workspace you will see a .botloader folder that holds the internal state of the workspace, this is how the extension is able to work so don't touch this folder as you might mess it up.
Creating, editing and removing scripts
All your scripts are located at the top level folder in the workspace (same level as the .botloader folder).
To create a script imply create a new file with the .ts suffix in the top-level folder, for example hello_world.ts.
You can edit all scripts in the folder as they were normal files, but changes won't be sent until you push them, see the next section for that.
To delete a script simply delete the file for it.
Deploying your changes to botloader
Any changes you make in the workspace will not appear until you deploy or push them to botloader, this is done by navigating to the "scm" or "source control" tab in vs code on the left side. In there you should see a list of added, changed and removed scripts and at the top and next to each file you should have the option to push the changes. Once you push the changes botloader will run your scripts.
Echo command tutorial
This is a short tutorial on how to make a simple echo command that echoes back the input
Setup
First step is to create a script, if you're using the web editor go to your server settings -> scripts in the sidebar, and create a new script with the name echo. (Or whatever else you want to call it.) and now you should be editing this script! Note that this script is not yet enabled, there's a button to enable it in the sidebar.
Creating the command
First, we want to import the Commands namespace, all botloader API's are exported under botloader so you can import the commands namespace like so:
import { Commands } from 'botloader';
Then it's creating the command itself, all scripts in botloader have a script variable that you use to set up various things such as event listeners, storage buckets and so on, including commands.
So, through the script we create a new command:
script.createSlashCommand(/* ... */);
script.createUserCommand(/* ... */);
script.createMessageCommand(/* ... */);
In this tutorial we'll be creating a "slash command". The user and message commands show up when you right click on users and messages, while slash commands shows up when you type a / in the chat input area on discord.
script.createSlashCommand takes a name and description. Note that the name requirements are quite strict, it can't contain spaces or special characters besides -
script.createSlashCommand("echo", "echoes back your input")
Were not done yet! This command takes in some input from the user to echo back, we need to define this input, and this is called options when dealing with commands. To add a option use one of the addOption methods, were going to use addOptionString and this takes in a name and a description, as well as some additional optional options (such as making this option optional/required) that were not gonna go into here.
This is how it looks then:
script.createSlashCommand("echo", "echo back what i give you")
    .addOptionString("what", "what to echo back")
Were still not done yet! This will still show an error and that's because we must build our command and give it a function to run when someone uses the command, you do that using the build method:
script.createSlashCommand("echo", "echo back what i give you")
    .addOptionString("what", "what to echo back")
    .build(async (ctx, args) => {
        // Code that runs when someone uses the command
    })
This is now a fully valid command and there should be no errors, if you save it and enable the script in the sidebar, after a short delay (around 10 seconds - a minute), it should show up in discord. But if you run it, it will have no output, it will just show the bot thinking forever...
So the next step is to make the bot echo back what the user gave it. To do that we use the first argument, ctx in above example.
This object is a instance of a interaction and the full docs for it can be viewed here, but the method were going to use to send a response is ctx.createFollowup which takes in either a simple string as a message or a more complex object for sending embeds and more.
Then to get the user input we use the second argument given to the callback, in the above example that would be the args object. This object has the "parsed" version of the options that we defined for the command, for this command that object looks like this:
{what: "whatever the user typed in"}
So, using those 2 pieces we can send back the user input as a response.
In the end the full script should look like this:
import { Commands } from 'botloader';

script.createSlashCommand("echo", "echo back what i give you")
    .addOptionString("what", "what to echo back")
    .build(async (ctx, args) => {
        await ctx.createFollowup(args.what);
    })
The reason we await it is so that the function does not return before we send the response.
Storage
Your vm is constantly restarted on botloader, this is to save on resources when it's not being used. Because of this there's a storage API for having persistent storage.
This storage API give you a key value database where you can store things such as numbers, or arbitrary json encoded data.
Buckets
This API is centered around buckets, a bucket can be thought of as a namespace, the same key can hold different values in different buckets even if the key is the same.
The same bucket can also be used in multiple scripts safely, allowing you to share data between them without any problems.
As of writing there are 2 different kinds of buckets:
Json buckets
Json buckets can hold any kind of object that can be used in JSON.stringify. Botloader handles the encoding and decoding from and to json for you.
See the API docs for Json buckets for all the methods available: here
Number buckets
Number buckets are a bit special, since they only hold numbers, they can be sorted efficiently behind the scenes, because of this they have the ability to return a list of sorted entries by their value.
An example of this would be a bucket for user scores where the key is the user's id and the value is their score. Using this you can easily fetch the top entries for display in a leaderboard without having to worry about sorting yourself.
See the API docs for Number buckets for all the methods available: here
Timers
Botloader does not provide a setTimeout or setInterval function that you may be familiar from the browser for reasons being it would keep your vm loaded while doing no work, effectively wasting resources. To get around this botloader provides the following:
- script.onInterval for executing a function on a interval. API
- Scheduled Tasks for scheduling something to be run at a specific time in the future.
Interval timers
Botloader provides Script.onInterval for executing a function on a interval.
Keep in mind that as mentioned in the script lifecycle section that your server's vm gets shut down whenever it's not in use, so your vm may shut down between these intervals and any variables set will be lost. (see the Storage section for persistent storage)
The function takes in 2 arguments, the name of the timer used for tracking when the interval last ran, and the interval itself.
The interval an be specified in 2 formats:
- Number of minutes
- Cron style string
Cron strings
Using the cron style string it can be useful to use an online tool such as crontab.guu to make the timer.
Here's an example cron string for executing a function every day at 1pm (UTC): 0 13 * * *
Scheduled tasks
Scheduled tasks provides the ability to run tasks at a specific time and date in the future. An example use case for ths would be a mute command where you would scheduled a un-mute task to un-mute them in the future.
Task buckets
The task system is based around the task bucket system, you define a namespace and the optional data attached to tasks in this namespace alongside a callback function that runs when tasks in this bucket is due.
Here is an example reminder command that sends a message at a certain time in the future:
import { Commands, Discord } from "botloader";

interface ReminderData {
    userId: string,
    message: string,
    channelId: string,
}

// This task bucket defines a namespace "reminders" that has tasks with the above
// "ReminderData" in them, used to handle the reminder task.
const reminders = script.createTaskBucket<ReminderData>({
    name: "reminders",
}, async (task) => {
    await Discord.createMessage(task.data.channelId, {
        content: `Reminder for <@${task.data.userId}>: ${task.data.message} `
    })
})

script.createSlashCommand("remindme", "Set a reminder for yourself")
    .addOptionInteger("minutes", "in how many minutes")
    .addOptionString("message", "reminder message")
    .build(async (ctx, args) => {
        const execAt = new Date(Date.now() + (args.minutes * 60 * 1000));

        const data: ReminderData = {
            message: args.message,
            userId: ctx.member.user.id,
            channelId: ctx.channelId,
        }

        await reminders.schedule({
            data: data,
            executeAt: execAt,
        });

        await ctx.createFollowup(`Reminder scheduled for <t:${Math.floor(execAt.getTime() / 1000)}> `)
    });
Optional unique "Key"
Tasks can also optionally have a unique key, this key can be used to ensure there is no duplicate tasks for this key, and also used to overwrite previous tasks scheduled using the same key. A use case for this would be a mute command where if you want to change the mute duration of a already muted user you can set the key to the user's Id, this way when you call Tasks.schedule you will overwrite the previous scheduled task for un-muting this user with the new date and time.
Script / Plugin Settings
Settings allows you to define a set of options that can be edited on the website (and in the future through commands) without having to modify the source code.
In plugins the benefits are pretty obvious, you get to expose configuration options for your plugin that servers can change to their liking.
It can also be useful in server scripts to expose settings to staff members that are not confident in touching the code.
Settings types
There are a number of settings types:
- Strings
- numbers (float, integer, integer64)
- role and roles (single vs multiple)
- channel and channels (single vs multiple)
In addition there's the list type that's a bit special, see the list section for more info on that one.
Defining settings options
Settings options are managed through the script.settings field, it's a instance of SettingsManager.
To define a option use one of the addOption* methods, or startList for lists.
Here's some examples:
const xpNameSetting = script.settings.addOptionString("xp_name", {
    label: "XP point name",
    description: "Name to give xp points",
    defaultValue: "xp",
    required: true,
})

const messageXpCooldownSecondsSetting = script.settings.addOptionInteger("message_xp_cooldown_seconds", {
    label: "Message XP coooldown",
    description: "The time period between messages to wait before they're eligible for more XP",
    defaultValue: 60,
    min: 0,
    required: true,
})

const blacklistedRolesSetting = script.settings.addOptionRoles("blacklisted_roles", {
    label: "Blacklisted Roles",
    description: "Users with these roles do not gain xp",
})

const blacklistedChannelsSetting = script.settings.addOptionChannels("blacklisted_channels", {
    label: "Blacklisted Channels",
    description: "Users do not gain xp in these channels",
})

const levelRolesSetting = script.settings.startList("level_roles")
    .addOptionInteger("level", {
        label: "Level",
        required: true,
        min: 1,
        description: "The level at which the user gains the role"
    })
    .addOptionRole("role", {
        label: "Level",
        required: true,
        description: "The role to assign the user",
        requireAssignable: true,
    }).complete({
        label: "Level Roles",
        description: "Roles to give users as they advance in levels",
    })
Settings List Option
The list option type, accessed through script.settings.startList is a special type that allows users to provide you with a list of values.
To use it you define the options that each list item has, sort of like a "schema" for the list items.
You add options to the list using the addOption methods on the list builder and complete it using the complete method.
Unlike with top level options you can mark options in the list as required without providing a default value, users will be prevented to save the new list items until they provide all the required values.
Here's an example of using the list option type for a level roles feature of a xp system:
const levelRolesSetting = script.settings.startList("level_roles")
    .addOptionInteger("level", {
        label: "Level",
        required: true,
        min: 1,
        description: "The level at which the user gains the role"
    })
    .addOptionRole("role", {
        label: "Level",
        required: true,
        description: "The role to assign the user",
        requireAssignable: true,
    }).complete({
        label: "Level Roles",
        description: "Roles to give users as they advance in levels",
    })

console.log(`Defined level roles: ${JSON.stringify(levelRolesSetting.value)}`)
Changing the "name" of a option
If you change the "name" of a option (not the label), then you will effectively wipe the saved value for it. This is because the name act as the "key" or "id" of the option. The label field exists so you can give a different cosmetic label to the option.
Changing a list object schema
Changing the list object schema can result in bad entries residing in a list, if you added a new required option the botloader will automatically filter out those bad entries when you load the value.
Reusing the option value name
Reusing the option value name for oen of more options is undefine behavior, i have plans on allowing scripts to change settings and this will break if you do so.
Changing option type
Botloader will try to do a best effort to maintain the typing correctness, it will wipe values if needed.
Changing option validation settings
As of writing, botloader does not re-validate saved options when you do this, so this could result in unexpected values if you do this. This may change in the future as the bot matures.
Interactions
This section has not been finished yet. You can find examples in the support server
Message components
From the discord docs (https://discord.com/developers/docs/interactions/message-components):
Message components—we'll call them "components" moving forward—are a framework for adding interactive elements to the messages your app or bot sends. They're accessible, customizable, and easy to use.
This is the components that can be used in messages:
- ActionRow: All components have to be within an action row
- You can have 5 action rows per message
- Each action row fits 5 buttons, or 1 select menu / text input (modal only)
- UrlButton: Basically a link to a webpage
- CustomButton: Button you can add a event handler to for custom behavior (more on that later)
- SelectMenu / UserSelectMenu / ChannelSelectMenu / RoleSelectMenu / MentionableSelectMenu
- "Mentionable" means users can submit either roles or users
- To turn a select into a multi select use
.setMaxValues(...)with a number above 1 - Select menus take up an entire action row
Handling interactions
Brief example
Here is an example of a message with a button and select menu components:
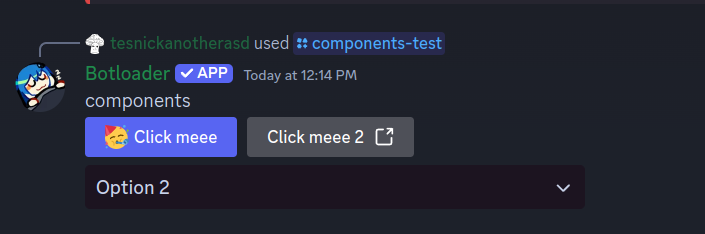
Code for the above:
import { Commands, Discord, HttpClient, Tasks } from 'botloader';

script.createSlashCommand("components-test", "Test command for components")
    .build(async (ctx, args) => {
        const botUser = Discord.getBotUser()

        await ctx.createFollowup({
            content: `components`,
            components: [
                new Discord.ActionRow([
                    new Discord.CustomButton("Click meee", "test-button").setStyle("Primary").setEmoji({ unicode: "🥳" }),
                    new Discord.UrlButton("Click meee 2", "https://botloader.io"),
                ]),
                new Discord.ActionRow([
                    new Discord.SelectMenu("text-select", [
                        new Discord.SelectMenuOption("Option 1", "Value 1"),
                        new Discord.SelectMenuOption("Option 2", "Value 2").setDefault(true),
                        new Discord.SelectMenuOption("Option 3", "Value 3"),
                    ])
                ]),
            ]
        })
    })

script.onInteractionSelectMenu("text-select", async (interaction) => {
    await interaction.ackWithMessage({
        content: "Data submitted: \n```json\n" + JSON.stringify(interaction.values) + "\n```"
    })
})

script.onInteractionButton("test-button", async (interaction) => {
    await interaction.ackWithMessage({
        content: "You clicked the button"
    })
})
Modals
Modals shows up a popup window for users to enter text into.
Modals only support text inputs currently, either ParagraphTextInput (multi-line) or ShortTextInput.
Modals can be triggered from:
- Commands
- You need to call
setAckModewithCustomand useackWithModal
- You need to call
- Button and all Select menu interactions using
ackWithModal
Below is an example of a modal triggered from a command:
import { Commands, Discord } from 'botloader';

script.createSlashCommand("modal", "open a modal")
    .addOptionString("default_text", "default text")
    .setAckMode("Custom")
    .build(
        async (ctx, args) => {
            await ctx.ackWithModal({
                // I haven't added a helper class for modals yet so we have to use the relatively low level
                // encodeInteractionCustomId function to add the custom id
                customId: Discord.encodeInteractionCustomId("test-modal", {}),
                title: "test-modal",
                components: [
                    new Discord.ActionRow([
                        new Discord.ParagraphTextInput("field", "input")
                            .setPlaceHolder(args.default_text ?? "stuff here!")
                            .setValue(args.default_text ?? "stufff"),
                    ])
                ]
            })
        }
    )

script.onInteractionModalSubmit("test-modal", (interaction) => {
    let input = interaction.values["input"];
    interaction.ackWithMessage({ content: "you input: " + input.value });
});
Handling interactions
Use one of the script.onInteraction* functions to register a handler for a component with the provided name.
To send a response you can either:
- Update the message that triggered the interaction using
ackWithUpdateMessageorackWithDeferredUpdateMessage - Send a new message using
ackWithMessageorackWithDeferredMessage
In the interaction handler you need to use one of the ack* functions to "acknowledge" the interaction within 3 seconds, if it might take longer you can use either interaction.ackWithDeferredUpdateMessage or interaction.ackWithDeferredMessage to tell discord you acknowledge it but need more time to send proper response.
Components can also have additional data embedded in them, you can read more about that in the component state section.
Component State
Discord has a mechanism for embedding a limited amount of data within components in a "custom id" field, this is limited to 100 bytes but botloader needs some of for internal matters so you should not expect more than 90 or so bytes available there. This is enough for embedding a couple of id's or something else.
Most component builders accept a last argument for passing in data, below is an example of a counter that keeps the current count in the component state:
import { Commands, Discord } from 'botloader';

interface CounterState {
    currentCount: number,
}

script.createSlashCommand("create-counter", "create a counter")
    .build(async (ctx) => {
        await ctx.createFollowup(createCountMessage({ currentCount: 0 }));
    })

// we can pass in <CounterState> to tell the function that we expect the data to have the `CounterState` structure
script.onInteractionButton<CounterState>("counter", async (interaction, data) => {
    await interaction.ackWithUpdateMessage(createCountMessage(data))
});


function createCountMessage(state: CounterState): Discord.CreateMessageFields {
    state.currentCount++;
    return {
        content: `count: ${state.currentCount}`,
        components: [
            new Discord.ActionRow([
                // state is embedded into the button here
                new Discord.CustomButton("Increment!", "counter", state).setStyle("Primary"),
            ]),
        ]
    }
}
Internally the component builders encodes the data in JSON (might be changed in the future to squeeze more data in) using encodeInteractionCustomId.
Commands
There are 3 types of commands:
- Slash commands: these show up in the chat input area when you type a slash and can be ran through there
- User commands: shows up when you right click on users
- Message commands: shows up when you right click on messages
Slash commands
This section has not been finished yet. You can find examples in the support server
User and Message commands
This section has not been finished yet. You can find examples in the support server
Script lifecycle
Internally botloader uses v8 for running your scripts but keeping all your scripts loaded in a v8 vm forever would be pretty inefficient, this is why botloader will shut down your vm when it's not needed and start it again once it's needed.
Botloader will not shut down your vm until it's "done" (done meaning there are no more pending futures), or you have exceeded your quota (there is no quota at the time of writing, there will be premium plans in the future extending this quota).
After your vm is shut down all variables set in it is lost. To get around this you can use the storage API, our key value based database to persist data and state.
When you change a script botloader will also re-run all your scripts as it needs to know what new timers, task handlers, event handlers and so on have been added/removed.